The primary electrical storage is the 144v bank of 12 each 80 amp/hr Lifeline AGM batteries
Receives charge from three sources
Regeneration from the prop spinning the motor while under sail
5kw 144v DC genset
110v powered 12v battery equalizer
Supplies power to
DC/DC Cross Charger/Converter144V to 12V 30 amp
Solomon ST 37 Motor
144v Air Conditioner (not yet installed)
The 12v control circuits for the 144v system are powered by a small 144v DC- DC converter
A switch permits using the first battery in the 144v bank for this power if the DC- DC converter fails
There is one House battery identical to the batteries in the 144v bank
The house 12v system receives power from
The 144v DC- DC converter up to 30 amps
110v 6amp battery charger
Solar trickle charger for long term storage (not yet installed)
A battery combiner can join the starter and house batteries if necessary
the Genset Starting Battery is the same as the others
The genset starting battery receives power from
A small DC-DC converter in the generator
A battery combiner can join the starter and house batteries if necessary
110v system
30 amp Shore power supplies power to:
3 duplex ground fault receptacles
6 amp battery charger for the House battery
110v powered 12v battery equalizer
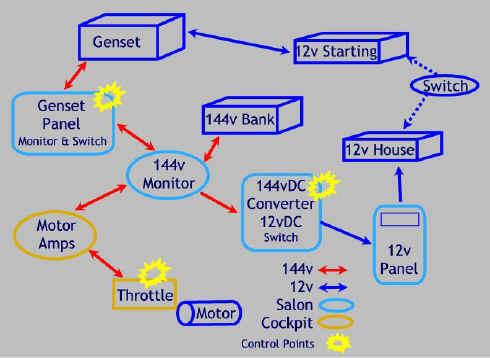
We switch on the 144v battery bank, the motor controller, DC-DC converter, and the breakers on the left side of the panel. Then we leave the dock silently using the electric motor. We use the Motor Amp Gauge to see how much power we are using. As we motor we keep an eye on the 144v Battery Bank Monitor to see how much power we have remaining.
We raise sail when we can, and then reduce the power on the throttle to the center point detent. The sailing will cause the motor to spin, and we then adjust the throttle to find the best setting on the Motor Amp Gauge. The gauge will show + when charging, and - when discharging.
It is a bit of a trick to keep the battery charging at optimum level, because the adjustment on the throttle is based on the speed of the boat. As the boat speed increases the throttle needs to be bumped up. If the speed then decreases, and the throttle isn't moved down, then the charging amps will go down, and could even go negative.
The wind is really blowing, and we're charging at 10 amps. We are watching the amps and voltage on the 144v Battery Bank Monitor , as long as the amps are above 5 there is no problem, but as the amp acceptance drops below 5 we need to start watching the volts. When the volts exceed 152 the batteries are fully charged, and it is time to increase the throttle above the optimum charge setting and begin powering the boat enough to offset the resistance of the prop, and bring the amps down to 1 amp to protect the batteries from overcharging. I am expecting an upgrade from Solomon Technologies in the next year to automate this charging process.
Well we are sailing along with a full charge and running all our instruments when suddenly the wind stops. It's time to motor, but it looks like we'll be motoring for more than 10 or 15 minutes, so there is no point running the batteries down in an hour and then putting on the genset, might as well do that now. If we waited, then when we did put the genset on we could only motor at half power because we would need to put some current into the batteries to begin charging them.
We put the genset on with a voltage setting of 155v, and run the throttle up to about 23 amps to use all the power from the genset for the motor since we don't need any to charge the batteries. We get ourselves in a bit of a pickle, trying to buck the waves and current getting though a cut and find it necessary to run the motor up at 36 amps. Since the genset can't supply that much power we draw about 10 amps from the batteries. After about two hours of this we have run the batteries pretty low, but now the wind has finally picked up and we can sail again.
We leave the genset on to charge the batteries, but set the voltage to 165 for a bulk charge. We'll monitor the amp acceptance, and when it gets down around 5 amps, we will reset the voltage to 155 till the acceptance gets to 2 amps, and then turn the genset off.
We're at our mooring. The instruments and motor controller are turned off, but the DC-DC converter is left on for house power. At bedtime we turn it off (to silence it's fan) because the house battery can easily keep everything powered for the night. In the morning we turn on the DC-DC converter to charge up the house battery and handle the regular house power needs.
12v panel
Left side
instruments, VHF, radar & autopilot
exterior outlets
Deck & navigation lighting
The lights in use are selected from a switch in the cockpit
Right side
Water pumps
interior outlets
lights & stereo
refer
SS radio
switched extra panel 12v power
Ceiling LED lighting
engine room light
windlass
inverter
Un-switched extra panel 12v power
head fan
bilge pumps & alarms
| The main cabin lighting is done with a series of LED lights
directed at the ceiling to create an ambiance that is comfortable for
"hanging out" but not suitable for "task
lighting" This bank of lights is not energized through the
panel, so it can be turned on if the panel breaker for lights is turned
off. The switch for these lights is convenient from the companionway.
There is another bank of LED's over each settee as well as over the galley, in the forward cabin, and in the head. The entire cabin can be illuminated for about 1 amp. |
Designed for small spaces, these LED lights are waterproof, shock proof and corrosion resistant. |
||||
| Reading lights are positioned at each end of the settees and in each cabin. |
12V with 10W Xenon bulb |
||||
| Fluorescent Lights
These standard fluorescent lights provide a lot of light. There is one in the main salon entry way which pretty much lights the whole salon. There is also one in the engine room. (The engine room light has a warning LED in the galley in case it is left on accidentally.) Cold Cathode Fluorescent Lights Lights are located in the head, over the stove, and in the forward cabin. Compared to traditional halogen and hot cathode fluorescent lighting, CCF’s are more substantial in construction and provide more efficient illumination and longer life while drawing very little from the boat’s batteries.
|
|
| The navigation and deck lights are controlled by a rotary switch can handle off of the navigation light configurations. Additionally there is a toggle switch to select mast head tricolor for offshore or hull mounted navigation lights. |
|
||
| The mast head tricolor is selected when the running lights are on and the toggle switch is in the up position. The deck mounted running lights are LED's |  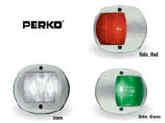 |
||
| The LED anchor light is a slightly bluer color than the other anchor lights, and it makes it easier to find Prestissimo in a crowded anchorage at night. | 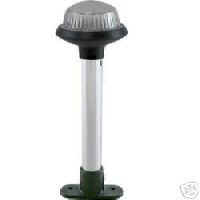 |
A lightning dissipater is located at the top of the
mast. It is connected via a #2 gauge wire to a 4 foot long bronze bar on
the bottom of the hull directly under the mast. The bar is 1.5" wide
and has groove running down the length creating 16 feet of corner edge to
conduct the lightning into the water. While this should be more than
enough for salt water, it is marginal for fresh water.
| Lightning Master LM-PP-2S Stainless Steal dissipater 18" to 24" above the mast
& antenna.
3/8" tube type 316 S.S. WEIGHT: 1.5 oz. Lightning Master Corporation
|
 |
 |
The dissipater, acting as an air terminal should create a zone of strike protection that covers the boat and radar mast.
|
| The 12v ground and the SSB ground both use the sintered bronze keel cooler for the refrigerator |  |
Interior 12vdc and 120vac (shore power only) are located on both sides of the salon, and in the forward cabin. A 120vac inverter outlet is at the nav station.
On deck, 12vdc outlets are in the lazaret and anchor locker
Current thinking consistent with "Never use something when nothing will do" is to leave the 110v system out except for a small inverter run off of the 12v system for small appliances like portable battery chargers and laptop computers. Space for a 120v AC inverter, distribution panel, and wire runs will be planned.
Modified December 01, 2005